
How to Turn a UI Design Idea Into a Working App Using Base44 (Figma Import, Step by Step)
You have the Figma file. The screens look good. The client (or your own side project) is waiting on the part where it actually works. That gap between a finished design and a working app is where most designers stall, and it is the exact gap Base44 is built to close.
This is a practical walkthrough of how to take a UI design idea and turn it into a working app on Base44, using the two paths the product actually supports: importing a Figma frame directly, or starting from a prompt with your mockup attached as a reference. Every step below comes from Base44's own documentation. I am not going to pretend I benchmarked it with a stopwatch. I am going to show you the workflow, where it is strong, and where you need to plan for cleanup.
If you want to follow along, open Base44 in another tab. The whole thing starts from the prompt box on the home screen.
Why this matters for designers specifically
Most "AI app builder" content is written for founders. Designers have a different problem. We already have the layout, the type scale, the component logic. What we lack is the backend, the auth, the hosting, and the willingness to spend three weekends in a codebase.
Base44's Figma import takes your frame and recreates the layout, structure and visual style as the starting point for an app. From there, the AI chat adds the pages, the data tables, the login flow and the hosting. You stay in the role you are good at: deciding what it should look like and how it should behave.
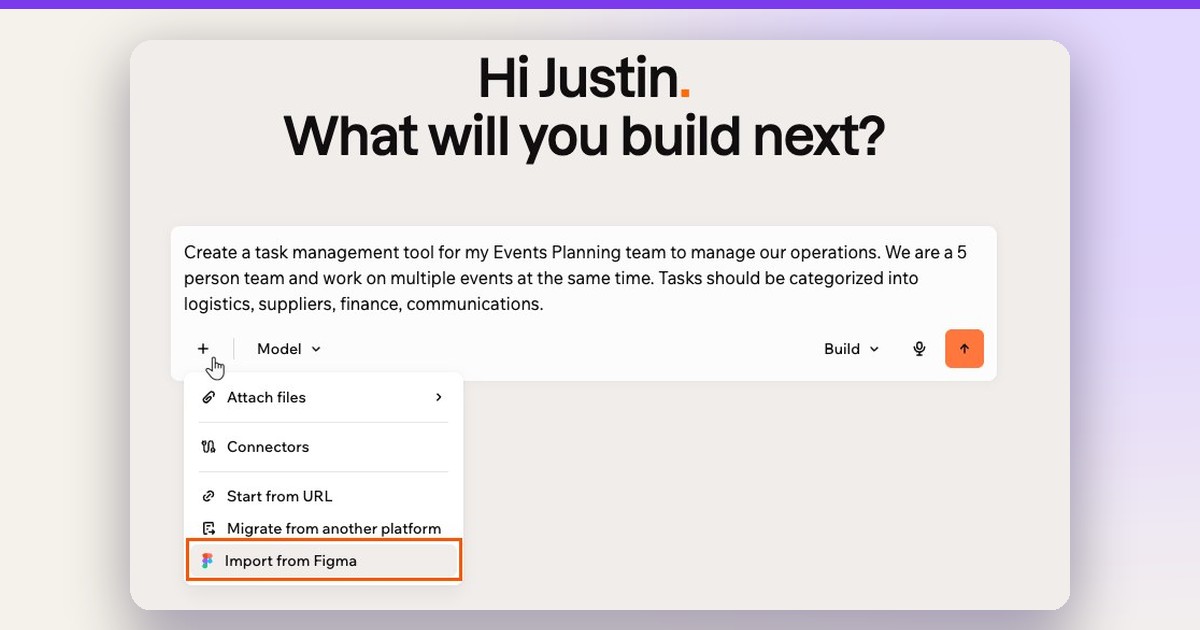
 The plus menu on the Base44 home prompt with Import from Figma. Image: Base44, via Importing from Figma.
The example we will build
Say you designed a client feedback tracker: a dashboard where a freelancer logs design rounds per client, and the client logs in to leave comments and approve a round. You have the main dashboard frame in Figma. You want the real thing: logged-in clients, saved feedback, a live URL.
Here is how the Base44 workflow lays out for that.
Step 1: Prepare the Figma frame (this is where most imports go wrong)
Base44 is explicit about what it reads well. Before you import, check these, straight from the Figma import guidelines:
- Wrap each section in its own frame. Sidebar, header, the client list, the feedback panel. Base44 uses those boundaries to build a responsive layout that matches your intent.
- Use Auto Layout on anything repeating. Cards, nav bars, list rows. A card with image, title and description should be one Auto Layout frame, not three loose layers. This is how Base44 understands how elements relate and resize.
- Flatten complex vectors. Multi-path icons become one vector. Outline strokes first, then flatten.
- Delete hidden and off-canvas layers. They interfere with the imported layout.
- One fill per element. Base44 only imports the last fill. Five stacked fills on a hero background will not survive.
- Use Google Fonts. Only Google Fonts are fully supported. Custom fonts get replaced with a default during import, and you fix typography afterwards inside Base44.
 A frame group after Auto Layout is applied. Image: Base44, via Importing from Figma.
Three access requirements too: you need a Figma Editor seat (Figma blocks API access for View and Collaborator accounts), the file must be a Figma Design file (not FigJam or Slides), and the frame link must be shared as Anyone with the link, can view. You can set it back to private after the import. One Figma account connects per Base44 workspace.
Step 2: Import the frame as a new app
From the Base44 home screen:
- Click the + icon in the prompt box.
- Click Import from Figma, then Connect to Figma and follow the prompts.
- Paste your frame link and click Generate.
The import focuses on the frame or section you selected. Other parts of the Figma file are not included unless you import them separately, which is a feature, not a bug: import your dashboard first, get it right, then bring in the rest.
If you already have an app in the editor and want to add a Figma screen later, the path is + in the AI chat, Add page from Figma, then in Figma right-click the frame, choose Copy/Paste as, Copy link to selection, paste, Add page. You are never locked into the first import.
Step 3: Turn one page into the whole product
Your imported dashboard is now the home page and the reference for everything else. Base44's own docs suggest a prompt for this moment, and it is worth using nearly verbatim:
Review the home page carefully, including both its content and its design style. Use the home page as the main reference to understand the website's structure and design language. Identify which additional pages are needed to create a complete website. Create the missing pages while maintaining the same design language, layout principles, and visual style as the home page, so they feel like a direct continuation and not disconnected. When finished, return to the home page and connect all relevant buttons and links so each one navigates to the appropriate internal page.
For the feedback tracker, follow it with the behavior you need, in plain words: "Add a Clients table and a Feedback Rounds table. Each round belongs to a client and has a status: in review, approved, changes requested. Clients log in and only see their own rounds. I see everything." Base44 builds the data model, the user roles and the permissions from that description. You can inspect and edit the tables later in Managing your app data.
If your design has repeated patterns (cards, feature rows, CTA blocks), name them in the prompt so the AI reuses them on new pages instead of inventing new ones.
Step 4: Refine the design with the three tools Base44 gives you
Base44's Designing with AI page is honest about which tool to reach for:
| Change you want | Use |
|---|---|
| Colors or fonts across the whole app | The Theme panel |
| One element or section you can point at | Edit mode |
| New layouts, redesigns, a different feel | The AI chat |
The order that works: Theme panel first for global colors and fonts (this is where you restore the typography the import replaced), then page-level changes one page at a time in chat, then polish individual elements in Edit mode.
 Designing an app with AI in Base44. Image: Base44, via Designing with AI.
When you ask for a layout change, Base44 may show you a few visual options with previews instead of applying one. Click Expand on an option, describe a targeted tweak, and Apply when it matches. Every prompt has a Revert, and version history is there if you go too far.
 Choosing from AI design options. Image: Base44, via Designing with AI.
One prompt pattern from the docs I would steal for every project: ask for a critique before asking for changes. "Critique the design of this dashboard only. Focus on layout, hierarchy, color, typography, and spacing. Then propose a short plan of small changes. Wait for my approval before you apply anything." You get a plan you can approve, not a surprise redesign.
No Figma file yet? Start from the idea instead
If the design only exists as a sketch or a screenshot, skip the import and use Plan mode. In the prompt box, switch the mode dropdown from Build to Plan, describe the app, and Base44 turns the conversation into a structured plan covering intent, audience and roles, core flows, and design. The design question comes last and works differently: you get 4 working previews of the main screen to pick from, and you can refine each up to 3 times.
 Switching to Plan mode. Image: Base44, via Starting from your first prompt.
Attach your mockup or screenshot with Attach files. Images and PDFs become visual reference so Base44 can match a design, and spreadsheets are read for columns and sample data so it can build around your real content. Plan mode costs a fraction of a credit per message; the first build after Start Building uses about 1 credit.
 Attaching files to your first prompt. Image: Base44, via Starting from your first prompt.
The limitations, stated plainly
Base44 documents these, and you should plan for them rather than be surprised:
- Fonts: Google Fonts only. Custom fonts are swapped for a default on import.
- Effects that may not survive exactly: image filters, multiple background layers on one element, and variables or variable-driven styles.
- Fills: only the last fill on an element is imported.
- Scope: one frame or section per import. Build the rest with prompts or additional imports.
- Responsiveness and interactions: fine-tune after import with the AI chat or Edit mode. The docs are direct about it: if your design leans heavily on unsupported effects or complex variable setups, expect visual differences and plan to refine inside Base44.
In practice that means the import gets you a faithful structure, your colors, your spacing and your hierarchy. It does not get you a pixel-perfect clone of a Figma file full of blend modes. Treat it as the best possible starting point, then finish the last 10 percent in Base44's own design tools.
What you end up with
For the feedback tracker example: a hosted app with your dashboard layout, additional pages that follow the same design language, two data tables with real permissions, client login, and a URL you can send. Everything you built lives in version history, and the data is editable from the app's dashboard. That is a shippable product, not a prototype you then have to hand to a developer.
Our take
The thing I like about this workflow is that it respects the design. Most AI builders ask you to describe a layout in words and then argue with the result. Importing the actual frame skips that argument. The prep work in Step 1 is real, but it is the same hygiene a good handoff to a developer would need anyway, and here the developer is the AI.
Where I would be careful: do not import a messy exploratory frame and expect magic. Clean the file, import one screen, extend with the docs' prompt, and use the critique-first pattern before any big redesign.
If you have a Figma design sitting around that never became a product, this is the week to change that. Start on Base44, import the frame, and send me what you ship.
Related on NewForm
Keep reading

Find Your Stack
Discover the perfect design tools for your workflow.
Take the 60-second quizNewForm Studio
Turn your designs into professional mockups instantly.
Open StudioMore from NewForm

Real People, Real Apps: What Winning With Base44 Actually Looks Like
Three real Base44 wins from real builders: a hosting company owner who shipped an internal tracker in one afternoon, a builder who launched two AI tools on a marketplace, and the boring-work-problem pattern behind almost every winning app.
6 min read · Nov 1, 2026

Base44 Can Now Send AI Hackers at Your App Before Real Ones Find It
Base44's new Tenzai integration runs an AI penetration test against your live app, including signed-in pages, then emails you what it broke and how to fix it. Here is how to set it up and when to run it.
5 min read · Nov 1, 2026